11 min to read
블로그 옮기기 ④:기능 추가하기
사용 블로그와 견줄수 있는 기능들을 만들어 넣어봅시다.


이 포스트는 "블로그 만들기" 시리즈의 5번째 포스트 입니다.
-
블로그 옮기기 ⓪:프롤로그 - 나는 왜 이 환경을 골랐나
저는 왜 블로그를 옮겼고, TeXt라는 테마를 골랐을까요? 블로그 제작기의 첫걸음 입니다.
-
블로그 옮기기 ①:첫걸음 Jekyll 기초
기초의 기초 프론트엔드 지식만 가지고 있는 상태에서, Jekyll 블로그를 운영하기 위한 기초 지식을 더 얹어 봅시다.
-
블로그 옮기기 ②:포스트 창 개선하기
TeXt의 기본 테마의 포스팅 화면에서 아쉬운점을 개선해봅시다.
-
블로그 옮기기 ③:본격 블로그 메인화면 꾸미기
밋밋한 블로그 화면을 화사하게 꾸며봅시다.
-
블로그 옮기기 ④:기능 추가하기
사용 블로그와 견줄수 있는 기능들을 만들어 넣어봅시다.
-
블로그 옮기기 ⑤:기타 블로그 관리
블로그를 관리할 때 필요한 여러 요소들을 익혀봅시다.
이번 포스트의 목표
이때까지의 작업으로 보기 좋은 블로그를 만들어 봤습니다만, 아직 기능적으로 아쉬운 부분들이 있음을 부정할 수 없습니다. 이번 포스팅에서는 상용 블로그 서비스보다 모자란 우리의 블로그에 여러 기능들을 불어넣어서, 여러 기능들을 넣어보려고 합니다. 블로그라면 당연히 있는 댓글 기능, 사람들에게 여러 페이지를 보여주고 싶은 욕심에서 나오는 관련 포스트 기능, 관련 있는 여러 글들을 묶어주는 시리즈 기능까지 한번 구현을 해 봅시다.
현재 진행상황
- Github 블로그 첫걸음
- 화면을 띄우기(
본인계정ID.github.io 접속 확인) Jekyll기능 및TeXt자체 기능 탐방
- 화면을 띄우기(
- 블로그 포스트 내용이 의도한대로 나오게 하기
Katex를 활용한 수식 입력 기능- 잘려서 나오는 목차 목록, 안잘리게 하기
- 코드 강조기능 커스텀하기
github-pagesgem 설치해서, 빌드환경과 테스트 환경 같게 만들기
- 그냥 글 목록만 나오는 메인 화면, 좀더 예쁘게 만들기
- 블로그 대문이 예쁘게 나오게 만들기
- 포스트 커버 이미지가 나오게 만들기
- 내 블로그 로고 만들어서 장식하기
- 원래 테마를 넘어서 : 새로운 기능들 추가
- 일기장에서 블로그로. 댓글 기능 달기
- 관련 게시글 기능 만들기
- 시리즈 기능 추가
- 블로그 관리 기타
Github action을 통한 배포 자동화Google Search Console사용하기- 광고 달기
- 개인 도메인 연결하기
9/16
일기장에서 블로그로. 댓글 기능 달기
jekyll은 정적 페이지 생성기라서, jekyll로 만든 github pages 블로그는 백엔드가 없습니다. 일반적으로 댓글등을 구현할떄는 댓글 DB와 소통하거나 해서 구현이 되지만, 여기서는 그런게 안되므로, 외부 서비스를 이용합니다.
일반적으로 disqus를 많이 쓰는것 같아서, disqus로 해보려고 하였으나, 무거워서 페이지가 많이 느려지고, 광고가 붙어 페이지의 심미성을 해친다는 말도 있어서, 대체 서비스를 알아봤습니다.
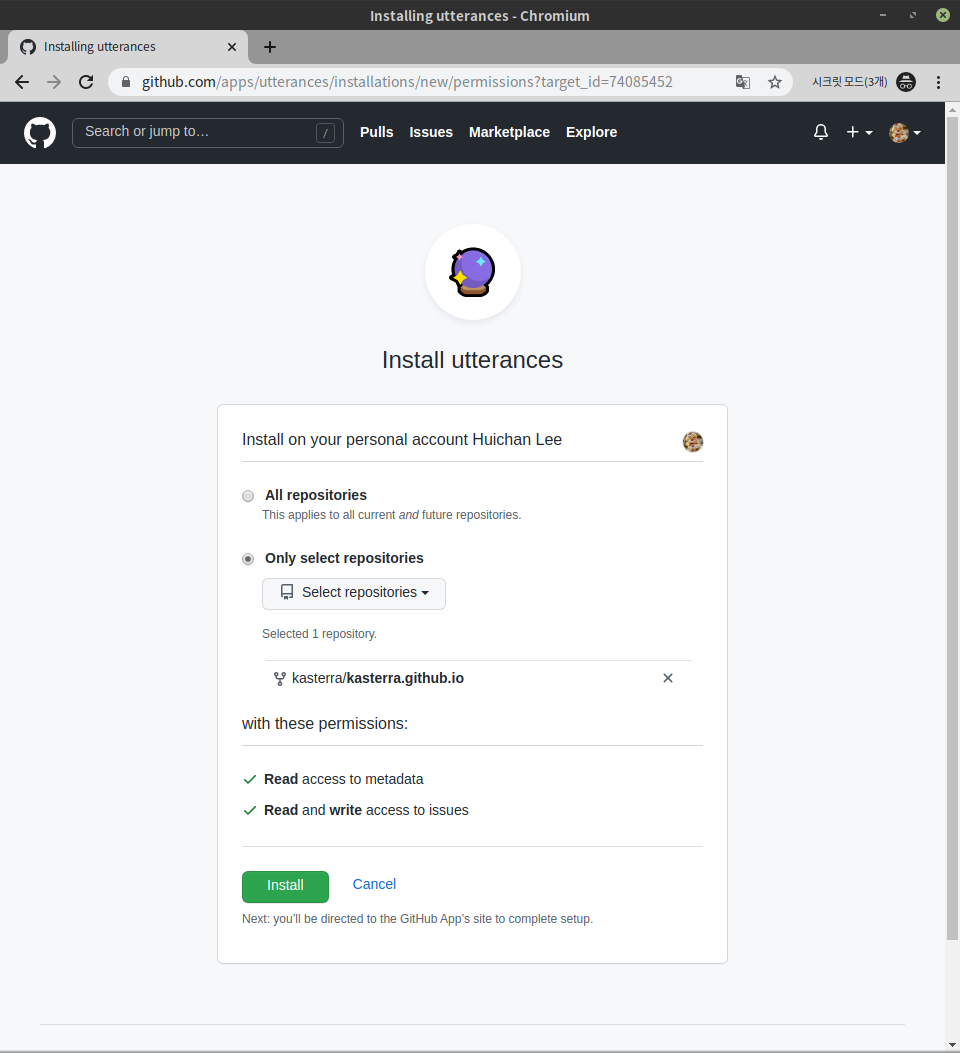
utterances라는 서비스 인데요, github pages로 블로그를 호스트 할 경우 쓸 수 있는 대체품 입니다. github으로 로그인해서 사용하고, 댓글은 해당 블로그가 있는 리포지토리의 issue로 등록되는 방식으로 운영됩니다. 상당히 가볍고, 설치가 편하다고 하여 사용해 보려고 합니다.
utterances 설치
https://github.com/apps/utterances 에 들어가서 설치를 합시다.
들어가서 install을 누르면 선택지가 두가지 나올 것입니다. 모든 리포지토리에 대해서 설정을 할지, 아니면 특정 한 리포지토리에만 설치를 할지 묻는 것인데요, 일단 지금 현재로는 github-pages로 운영할 페이지는 이 블로그 하나밖에 없기에, 후자를 택했습니다.
그리고 쭉 설정을 진행하여 주면, html코드 조각이 나옵니다.
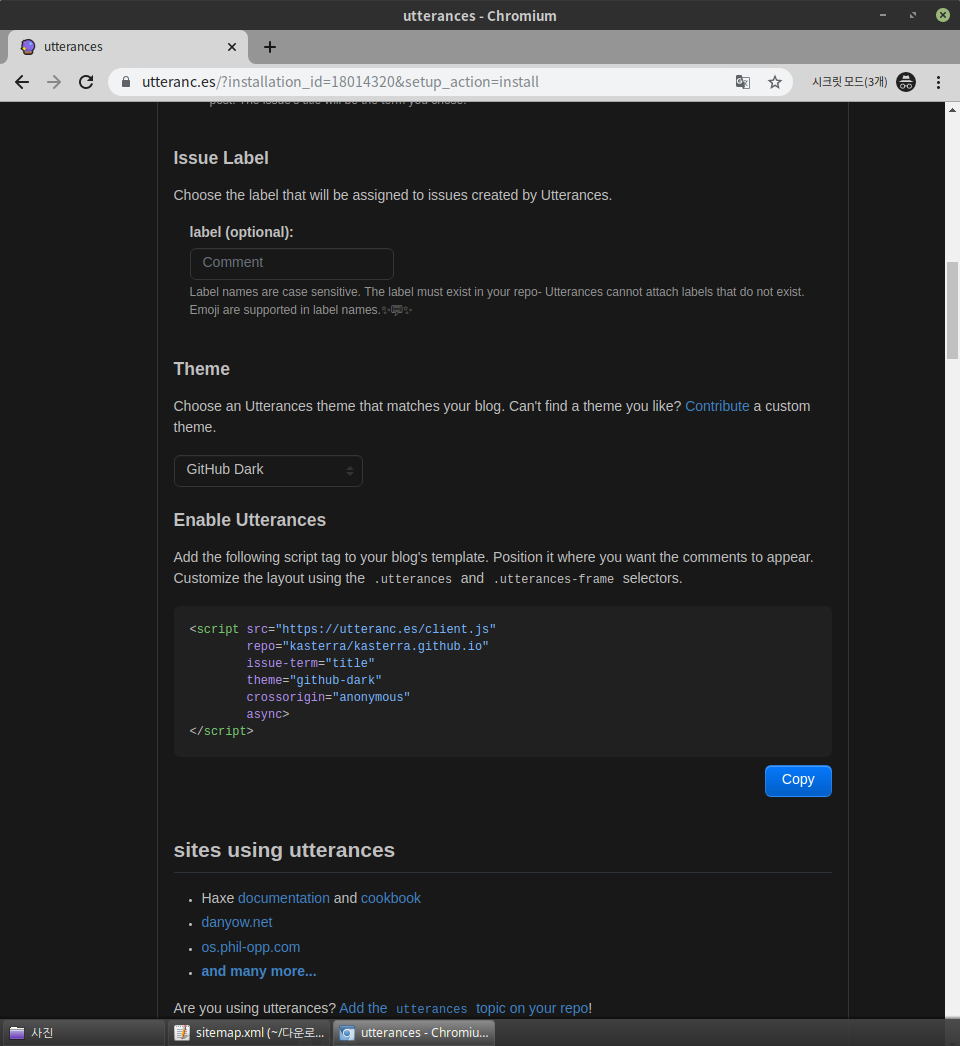
밑의 html 코드를 복사하여 적절한 곳에 붙어넣어야 합니다.
댓글 코드 붙여넣기
TeXt에서 자체적으로 댓글 기능을 지원한다지만, utterances는 지원 대상이 아닙니다. 직접 설정해 봅시다.
저는 라이센스 표시 밑에 댓글이 달렸으면 좋겠다고 생각하여, 라이센스 출력을 하는 _includes/article-footer.html를 다음과 같이 수정했습니다.
_includes/article-footer.html 맨 끝부분
{%- if page.comment -%}
<script
  src="https://utteranc.es/client.js"
  repo="kasterra/kasterra.github.io"
  issue-term="title"
  theme="github-light"
  crossorigin="anonymous"
  async
></script>
{%- endif -%}
이렇게 넣어주면, page의 머릿말에서 comment변수가 참이라면, 댓글 기능이 실행되게 하는 것입니다. 간혹 몇몇 글에는 댓글을 표시하고 싶지 않을 수도 있으니까요. 하지만, 대부분의 글에 댓글이 있길 바라는 저로써는, 매번 글을 적을때마다 comment: true를 적는것보다, 댓글을 표시를 안하고 싶은 글에다가 comment: false를 적는것이 더 좋겠다고 생각이 듭니다. 기본값을 수정하기 위해서 _config.yaml을 수정해 봅시다.
_config.yml 의 defaults 부분
defaults:
  - scope:
      path: ""
      type: posts
    values:
      layout: post
      sharing: true
      license: true
      aside:
        toc: true
      show_edit_on_github: true
      show_subscribe: true
      pageview: true
      comment: true # 이 부분을 추가했습니다.
이제 정상적으로 동작하는지 확인해보겠습니다.
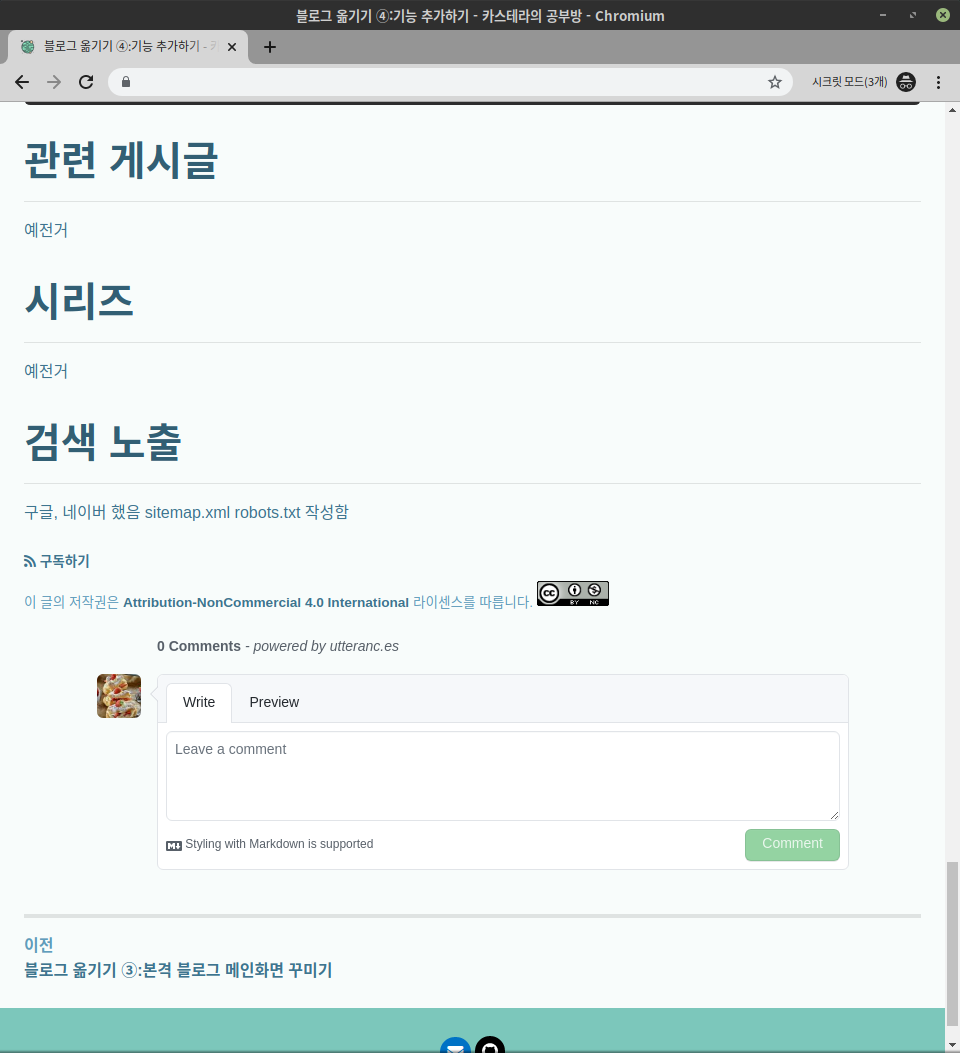
정상적으로 작동함을 볼 수 있습니다.
현재 진행상황
- Github 블로그 첫걸음
- 화면을 띄우기(
본인계정ID.github.io 접속 확인) Jekyll기능 및TeXt자체 기능 탐방
- 화면을 띄우기(
- 블로그 포스트 내용이 의도한대로 나오게 하기
Katex를 활용한 수식 입력 기능- 잘려서 나오는 목차 목록, 안잘리게 하기
- 코드 강조기능 커스텀하기
github-pagesgem 설치해서, 빌드환경과 테스트 환경 같게 만들기
- 그냥 글 목록만 나오는 메인 화면, 좀더 예쁘게 만들기
- 블로그 대문이 예쁘게 나오게 만들기
- 포스트 커버 이미지가 나오게 만들기
- 내 블로그 로고 만들어서 장식하기
- 원래 테마를 넘어서 : 새로운 기능들 추가
- 일기장에서 블로그로. 댓글 기능 달기
- 관련 게시글 기능 만들기
- 시리즈 기능 추가
- 블로그 관리 기타
Github action을 통한 배포 자동화Google Search Console사용하기- 광고 달기
- 개인 도메인 연결하기
10/16
관련 게시글
https://github.com/wu-ming/jekyll-related-posts 을 참고해서 만들었습니다. 간단히, 원리를 소개하자면, 게시글의 태그를 확인해 보면서, 일치하는 태그가 많을수록 더 관련있는 게시글로 판단을 하는 코드입니다. 대단한 자료분석은 하지 않지만, 랜덤한 게시글을 추천하는것보다는 낫다고 봅니다.
예전에 설명했던 TeXt의 swiper기능을 결합해서 만들었습니다.
related-post.html
{% assign showRelatedPosts = 5 %} {% capture posts %} {% for post in site.posts
%} {% if post.url != page.url %} {% assign matchingTags = "" | split: "," %} {%
for tag in post.tags %} {% assign currentPostTag = tag | downcase %} {% assign
tagsPage = page.tags | downcase %} {% if tagsPage contains currentPostTag %} {%
assign matchingTags = matchingTags | push: currentPostTag %} {% endif %} {%
endfor %} {% assign tagsTotal = matchingTags.size %} {% if tagsTotal < 10 %} {%
assign tagsTotal = tagsTotal | prepend: "0" %} {% else %} {% assign tagsTotal =
tagsTotal %} {% endif %} |
<article>
  <strong><!--{{ tagsTotal }}--></strong>
  <header>
    <h5>{{ post.title }}</h5>
  </header>
  <section>
    <a href="{{ site.baseurl }}{{ post.url }}">
      <img
        width="240"
        height="150"
        src="{{ post.cover }}"
        class="img-fluid"
        alt="{{ post.cover }}"
      />
    </a>
    <div>
      {% for tag in post.tags %}
      <a
        class="button button--secondary button--pill button--sm"
        href="/archive.html?tag={{tag}}"
        >{{tag}}</a
      >
      {% endfor %}
    </div>
  </section>
</article>
{% endif %} {% endfor %} {% endcapture %} {% assign relatedPosts = posts |
split: '|' | sort | reverse %}
<header>
  <h4>관련 포스트 목록:</h4>
  <hr />
</header>
<style>
  .related {
    width: 500px;
    max-width: 100%;
  }
</style>
<div style="display: flex; justify-content: center;">
  <div class="swiper related">
    <div style="text-align: center;">
      <div class="swiper__wrapper">
        {% for i in (1..showRelatedPosts) %}
        <div class="swiper__slide">{{ relatedPosts[i] }}</div>
        {% endfor %}
      </div>
    </div>
    <div class="swiper__button swiper__button--prev fas fa-chevron-left"></div>
    <div class="swiper__button swiper__button--next fas fa-chevron-right"></div>
  </div>
</div>
<script>
  {%- include scripts/lib/swiper.js -%}
    var SOURCES = window.TEXT_VARIABLES.sources;
    window.Lazyload.js(SOURCES.jquery, function() {
      $('.related').swiper();
    });
</script>
이것을 _includes/article/footer/related-post.html에 저장한 다음, 이를 _includes/article-footer.html에 반영시키면 됩니다.
{%- if page.show_related_posts -%} {%- include article/footer/related-post.html
-%} {%- endif -%} {%- if _show_subscribe -%}
<div class="article__subscribe">
  {%- include article/footer/subscribe.html -%}
</div>
{%- endif -%}
적당히 이런식으로 만들면 됩니다. show_related_posts는 본인이 알아서 설정하면 되구요.
시리즈
velog에는 한 포스팅으로 적기에는 너무나 긴 글들을 위해서, 글들을 한 시리즈로 묶고, 그것을 포스팅에 표시해주는 좋은 기능이 있습니다. Jekyll 에는 이를 공짜로 지원하지 않기에, 직접 만들어야죠 뭐.
이 역시, 위의 관련 게시글 작성하는것처럼 매우 단순합니다. https://digitaldrummerj.me/blogging-on-github-part-13-creating-an-article-series/를 참고해서 뚝딱뚝딱 했습니다.
{%- if page.series -%} {% assign count = '0' %} {% assign idx = '0' %} {% for
post in site.posts reversed %} {% if post.series == page.series %} {% capture
count %}{{ count | plus: '1' }}{% endcapture %} {% if post.url == page.url %} {%
capture idx %}{{count}}{% endcapture %} {% endif %} {% endif %} {% endfor %}
<style>
  .panel {
    margin: 20px 0px;
    background-color: #fff;
    border: 1px solid #ddd;
    border-radius: 4px;
    -webkit-box-shadow: 0 1px 1px rgba(0, 0, 0, 0.05);
    box-shadow: 0 1px 1px rgba(0, 0, 0, 0.05);
    overflow: hidden;
  }
  .panel--active {
    opacity: 1;
  }

  .seriesNote {
    transform-origin: top left;
    will-change: transform;
    animation-duration: 200ms;
    animation-timing-function: linear;
  }
  .seriesNote-content {
    transform-origin: top left;
    will-change: transform;
    animation-duration: 200ms;
    animation-timing-function: linear;
    padding: 0px 15px;
  }
  .panel h4,
  .panel h5,
  .panel h6,
  .panel i {
    margin: 0.4rem 0rem;
  }
  .panel h4,
  .panel h5 {
    display: inline;
  }
  .panel-heading {
    padding: 10px 15px;
    position: relative;
    background-color: #f5f5f5;
    border-bottom: 1px solid #ddd;
    border-top-right-radius: 3px;
    border-top-left-radius: 3px;
  }
  .panel ul {
    margin: 1em;
  }
</style>

<div class="panel seriesNote">
  <div class="panel-heading" style="position:relative;">
    <h4>
      이 포스트는 <strong>"{{page.series}}"</strong> 시리즈의
      <strong>{{idx}}</strong>번째 포스트 입니다.
    </h4>
  </div>
  <ul>
    {% assign count = '0' %} {% for post in site.posts reversed %} {% if
    post.series == page.series %} {% capture count %}{{ count | plus: '1' }}{%
    endcapture %}
    <li>
      {% if page.url == post.url %}
      <h5>{{post.title}}</h5>
      {% else %}
      <h5><a href="{{post.url}}">{{post.title}}</a></h5>
      {% endif %}
      <h6>{{post.excerpt}}</h6>
    </li>
    {% endif %} {% endfor %}
  </ul>
</div>
{%- endif -%}
이것 또한 위와 비슷하게 적절한 곳에 배치해주면 됩니다.